
10 Free Beginner Crocheted Sweaters
Updated: Aug 3, 2020
This post contains affiliate links. If you're interest in supporting this blog and enabling me to bring you even more great content, please consider making a purchase through the links, at no extra charge to you.

Sweater are often looked at a upping your crochet game, but they do NOT have to be intimidating. If you can make a hat and a blanket, you can figure out a simple sweater pattern. And why not do it with a free pattern first so you can can get your feet wet without committing to the expense of purchasing something and then finding out you don't love the way the pattern is written?
I love that I can read all the way through the pattern first before I decide to take on a project, because sometimes other designers think very differently about how describe and explain things.
And I DO suggest reading all the way through any pattern before you begin it, just to get a feel for where everything is going to go and how it all gets put together. This has saved me from misunderstanding directions a number of times.
I've compiled this list to give you a variety of simple and easy choices with a number of different construction techniques. Plus, there's every style from cozy and warm to lightweight and summery!
by Megmade With Love

Seriously, this is the easiest of easy patterns. It comes in sizes S, M, and L, but Meg makes sure to point out that a few simple measurements and additional stitches, you could make it any size you want. It's extremely easy to customize how slouchy or form-fitting it is, how long or short the sleeves are, whether it sits close to your neck or falls off the shoulder, and for lengthening or shortening it anywhere from tunic to crop top.
It's made from chain stitches, half-double crochet, half-double crochet two in one stitch, and working in the back loop. Plus, she give you excellent blow-up photos detailing where and how to pick up the stitches to start the body after you finish the ribbing and also where and how to sew the pieces together at the end to finish it.
It's utterly foolproof and still totally cute! The pattern is available on Megmade With Love's website here.

by Lion Brand
This one comes in even more sizes, from S to 2XL. It requires you to learn a mesh stitch pattern, which is very simple and is just a blend of chains with double crochets. It is also made in four pieces and then stitched together at the end.
One of the best things about this pattern is that, since it's written by a major yarn company, it has been thoroughly tested and you can e-mail them 7 days a week with any questions you have. You have personalized support at your fingertips!
It's a little interesting since it has more texture variation, and it also has the benefit of the additional sizes written into the pattern already, but it isn't quite as flexible or adaptable as some. It's also a wonderful way to show of some cool yarn colors and fibers!
The pattern is available here.

by Bernat
Okay, so technically, this is a child's pattern. BUT I had to include it for a few reasons. One, it's a top-down construction which makes it suuuper versatile and easy to make to your exact size and preference. You start at the neck, increase until you've got enough body, stop working the stitches used for the sleeves, and then continue until it's as long as you want. Top down really is my favorite for so many reasons!
All you have to do to adapt it to an adult's size is as follows:
-Start with the size 12, work the first 3 rows of the neck and the 7 rounds of the top.
-Work rounds 4-7 until the yoke is long enough to go down to the bottom of your bust. Just try it on as you go. You should then be able to pinch the work together to fit under your armpits and have room for your arms in the sleeves and enough around the front and back for your bust and shoulder blades. If it's too tight, work another repeat and try it on again.
-On page two, you divide for the armholes. Start by counting all the stitches you have in the round. Multiply your stitch number by 0.15 (which is 15%) and work those stitches as said in the pattern.
-Multiply the whole stitch number by 0.20(i.e. 20%) and skip those for the first sleeve.
-Multiply the whole stitch number by 0.30(i.e. 30%) and work for the front.
-Take the 20% number again for the second sleeve and skip those also.
-Work remaining 15% of stitches across the back. You've separated the sleeves.
-As stated in the pattern, work rounds 3 and 4, and then repeat round 4 until the tunic is as long as you want. You can try it on as often as you want as you go.
-Work sleeves as the pattern says but substituting your own sleeve stitch count instead of their child sizes.
Voila! You have adapted the pattern to EXACTLY YOUR SIZE with very little extra effort.
The pattern is available through Ravelry here.

by Lion Brand
This one is literally worked as a giant plus symbol(+) with a hole in the middle for the neck. The cuffs, neck, and bottom are worked afterwards with a special edging pattern. All the instructions for it fit on one page.
It's available in lot of sizes again, from S to 2XL, and has the full pattern support of the Lion Brand team. Gauge is important if you want the fit just right since you won't be able to go back and add or change stuff as easily as some of the patterns that come in four pieces. Make sure you swatch. I promise it will be worth your time!
If you like mindless crochet, this is a great pick since the pattern is easy to memorize and, besides finishing work and the neck hole, it's also quite repetitive and basic.
Pattern available here.

by Lion Brand
Yet another different construction technique. This one is worked sideways! You always work only into the back loop with creates the ribbing texture. You start by created a slightly flared rectangle for the front, then you leave a gap for the first sleeve, and then work an identical flared rectangle for the back. Sew the one side seam except for an opening for the second sleeve. Pick up around each sleeve opening and crochet around until the sleeves are the desired length.
You get a totally different look and it isn't any harder than any of the other patterns. And, if you feel adventurous, you can readily adapt the pattern with any other decorative crochet stitch in place of the ribbing. Create any cowl-neck sweater with limitless options.
As with the Classic Pullover, make sure to check your gauge before you start so that you don't end up with a sweater that is way too long or too short. Being ribbing, it's pretty forgiving with how it will fit around the waist and bust, and you can always add or subtract a few repeats to get a more comfortable fit.
The pattern is available here.

by Hooked on Tilly
Classic raglan! This is the style that has the attractive diagonal seams that go from the neckline to the base of the sleeve. It's super easy to adapt to a top-down construction, such as in this sweater here.
The top is worked in rounds until the armpit, at which time the sleeve stitches are skipped and picked back up at the end of the pattern. It's worked with a larger crochet hook than usually used for the yarn weight in order to get the loose and airy texture.
The only thing that could cause a little bit of a challenge is the after-thought ribbing at the waistline and cuffs. However, there is a full video tutorial on YouTube made specifically to go along with the pattern that will easily clear up any confusion.
The pattern is available for free directly on the Hooked on Tilly blog here.

7. Empire Crop
Originally written for a lush velvet yarn held double, this is the only sweater on the list specifically suitable for bulky yarn. Which also means that it's more than likely to be the quickest crochet of them all. I mean, you're even using a size L hook for it!
The pattern includes sizes XS through 2XL and is made with a little bit more neckline shaping than the other patterns listed. It has a small mock turtleneck added at the very end.
It's available for free on the Two of Wands blog here.

by Lion Brand
Yet another gem by Lion Brand. If you can granny square, you can make this top. Any, fyi, everyone can granny square! It's constructed from the middle. You end up with just two pieces to seam together, and the neckline, waist, and sleeves are picked up and worked at the very end.
The writer made sure to write out very detailed instructions, so they might look a little intimidating, but it is so simple. There's some great diagrams at the back for how it all comes together, so make sure you read the whole pattern before you start to make sure you miss an easy component.
Sized S through 3XL! And as will all Lion Brand patterns, they have e-mail support available every day to help you if you get stuck.

9. Cabana Top
by Sewrella
So, so, so simple. This one you don't even have to figure out a neckline. You have to rock some mesh, but it's the easiest kind. Crocheted as a T and then the tops of the sleeves and side seams are sewn together. A great way to use some comfy cotton yarn or a striping color yarn since you won't have any trouble getting the sleeves to match.
The pattern is available on Sewrella here.
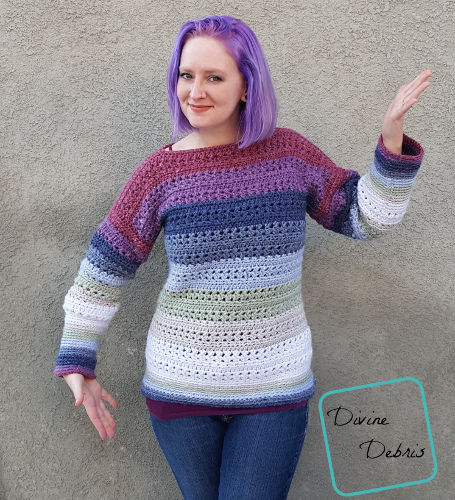
by Divine Debris
This is my FAVORITE of the list, but it is also the most complicated. It's certainly beginner-friendly, but you have to be willing to be just a little bit adventurous too! It comes in S to 3XL, using either 7 or 8 different colors as written. Of course, if you wanted to switch up the combos on that, no one is stopping you!
One of the great things about it, and what makes it still readily qualify as a beginner pattern, is that the fancy pattern is created by just one beyond basic stitch that is very easy to learn. By the time you are on the second color, you'll have it down. And the color changes are simple block colors that are so easy in crocheting that it's almost like not changing colors at all.
It's worked from the neckline out to the wasitband, one color at a time until after the armpits. Then the work is joined back together and you can work the rest of the body seamlessly. The sleeve are picked up and then worked down to the cuffs.
You'll get a healthy pep talk at the beginning about checking you gauge, and take the extra ten minutes because it will save you hours of work and disappointment later.
Found here!
Even a really new beginner can tackle something as intimidating as a sweater, because there are patterns out there that help you realize it is not nearly as scary as you might think. Making basic alterations for fit and style are also super easy with crochet. You can literally add a stitch or two or twelve nearly anywhere you feel like.
I hope you enjoy your first(or second, or fortieth) sweater journey and happy crocheting!


Comments